
Across the United States, 3D printers have moved out of specialty labs and into small businesses, design studios, product development shops, and home workshops. With that shift has come a practical reality: when a printer fails mid-job or starts producing inconsistent output, the disruption is immediate and often costly. Downtime that once affected only hobbyists now affects deadlines, client deliverables, and production schedules.
The challenge is that most printer failures are not catastrophic. A significant portion of the issues that prompt a service call can be identified, and in many cases resolved, before a technician ever arrives. The problem is that most operators do not have a structured way to think through what is wrong before picking up the phone. They experience a symptom, feel uncertain, and escalate quickly — sometimes unnecessarily, sometimes too late.
This checklist is built for that gap. It is designed for makers, shop managers, and in-house fabricators who want to approach printer problems methodically, understand what they are dealing with, and make an informed decision about when professional repair is genuinely needed.
Understanding What 3D Printer Repair Actually Involves
Before working through any checklist, it helps to understand what the repair process actually covers. 3D printer repair is not a single procedure — it encompasses mechanical diagnostics, firmware and software troubleshooting, component replacement, calibration, and in some cases, full hardware assessment. Each of those areas requires a different kind of attention and carries different implications for how urgently you should act.
For anyone trying to understand the scope of what professional service includes, a 3d Printer Repair overview can clarify what technicians typically assess, what common failure categories look like, and what separates a field-resolvable issue from one that requires shop-level intervention.
Knowing this distinction matters because it changes how you triage the problem. If you conflate a basic calibration drift with a failing stepper motor, you may either waste time on adjustments that cannot fix the real issue or spend money on a service call for something correctable in-house.
The Difference Between a Symptom and a Root Cause
Most operators describe printer problems in terms of what they see: warped prints, stringing, layer separation, or a nozzle that will not extrude. These are symptoms. The underlying causes can range from a worn PTFE liner to an incorrectly configured slicer profile to a loose motion system component. Treating a symptom without identifying the cause leads to repeat failures and unnecessary parts replacement.
A structured approach means working backward from the symptom to the system most likely responsible — and then testing that assumption before drawing conclusions. This is the core logic behind any effective diagnostic checklist.
The Pre-Check: Document Before You Touch Anything
When a print fails or a printer starts behaving erratically, the first instinct is often to start adjusting things immediately. That instinct, while understandable, frequently makes the problem harder to diagnose. Changes made without documentation can mask the original condition or introduce new variables that cloud the picture.
Before making any adjustments, take a moment to record what you observed: when the problem started, what the printer was doing at the time, whether anything changed recently — new filament, a firmware update, a new print profile, or even a change in ambient conditions like humidity or temperature. This information is directly useful to a technician if the problem escalates, and it often reveals the cause on its own.
Why Environmental Conditions Are Frequently Overlooked
The operating environment of a 3D printer is rarely accounted for in standard troubleshooting guides. Yet temperature variation, airflow inconsistency, and surface vibration all affect print quality in real, measurable ways. A printer that performed reliably in summer may begin producing adhesion failures in winter if the ambient temperature in the workspace has dropped significantly. Similarly, a printer placed near an HVAC vent may experience cooling inconsistencies that affect layer bonding.
Noting environmental conditions as part of your pre-check is not about finding an excuse for poor output — it is about ruling out variables before focusing on hardware or software. If conditions have changed and print quality has changed correspondingly, that relationship is worth investigating before assuming a component has failed.
Mechanical Checks Every Operator Should Know
Mechanical wear is one of the most common contributors to print quality degradation, and it tends to develop gradually rather than all at once. This makes it easy to overlook because the printer continues to function — just less reliably than before. A printer that is producing slightly inconsistent layer heights or showing Z-axis banding may simply have a lead screw that needs lubrication or a rod that has accumulated debris.
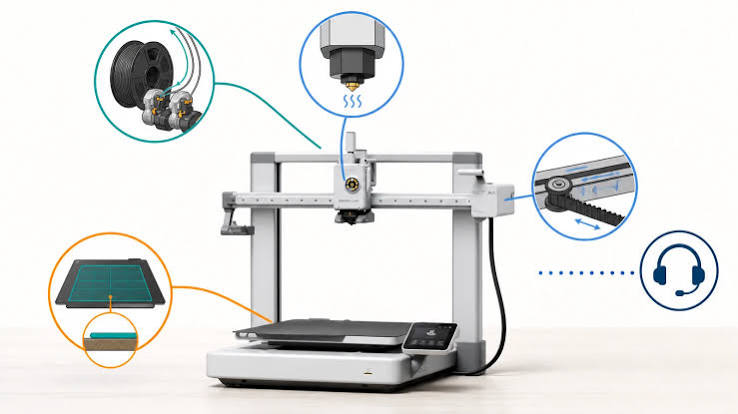
Working through the mechanical systems in a structured sequence helps isolate where degradation is occurring. The motion system — including belts, rods, lead screws, and pulleys — is the starting point. Belts stretch over time and lose tension. Pulleys develop play. Linear rods accumulate grime that increases friction. None of these failures happen instantly, but each one affects print quality in characteristic ways.
Checking the Hotend and Extruder Assembly
The hotend and extruder are the components that interact most directly with the filament, and they are subject to wear, clogging, and heat-related degradation. A partial clog, for example, produces symptoms that can look like a filament moisture problem or a temperature inconsistency — which is why isolating this component specifically is important.
A cold pull is the standard first step for hotend assessment. It removes debris from inside the nozzle and gives you direct feedback on whether material flow is obstructed. If a cold pull reveals discolored or degraded filament, that suggests either a temperature issue or filament that has been sitting in the hotend too long. If the pull itself is difficult or incomplete, a more thorough cleaning or nozzle replacement may be warranted.
The extruder gear and tensioner also deserve inspection. Worn extruder gears lose their grip on filament, causing inconsistent feeding that appears in the print as under-extrusion. This is a relatively straightforward component to inspect visually, and replacement is usually within reach for most operators before a service call is needed.
Software and Firmware as a Source of Print Failures
A significant portion of 3D printer repair calls involve issues that originate in software — not in hardware at all. Slicer settings, firmware versions, and communication between the printer and the host computer all affect output quality in ways that are not always obvious from looking at the printer itself.
According to the National Institute of Standards and Technology, process parameters in additive manufacturing have a direct relationship with output quality and consistency — a principle that applies even at the consumer and prosumer printer level. When a print fails, the slicer profile used to generate the toolpath is a legitimate variable to examine.
When Firmware Updates Cause Unexpected Behavior
Firmware updates are often applied without full awareness of what they change. A printer that behaved predictably before an update may begin showing new behavior — changes in acceleration, stepper motor handling, or thermal management — that looks like a hardware fault but is actually a configuration shift introduced by the update.
Before concluding that a hardware component has failed, check whether a firmware update preceded the change in behavior. Rolling back to a previous firmware version, where that option is available, is a legitimate diagnostic step and can quickly confirm or rule out firmware as the cause.
Bed Adhesion and Calibration: The Most Common Misdiagnosed Category
Bed adhesion failures and first-layer problems are among the most frequently misdiagnosed issues in 3D printer repair. Operators often assume the print surface is contaminated or worn when the actual issue is a z-offset that has drifted, a bed that is no longer level, or a combination of both. These are calibration issues, not hardware failures.
Manual bed leveling, even on printers with automatic leveling systems, should be part of regular maintenance. Automatic leveling compensates for variation but has limits. If the probe itself is damaged, dirty, or reading inconsistently, the compensation it applies will be incorrect — producing adhesion failures that look like surface or temperature problems.
Distinguishing a Worn Bed Surface from a Calibration Drift
Bed surfaces do wear over time. Glass develops micro-scratches that reduce adhesion. PEI sheets lose their grip after repeated heating and cooling cycles. Identifying whether the surface itself is the problem, or whether calibration has shifted, requires running a controlled first layer test after a fresh calibration. If adhesion improves after recalibration, the surface was not the primary issue. If the problem persists across recalibration attempts, the surface may genuinely need replacement or reconditioning.
When to Stop and Call a Technician
This checklist is designed to support informed self-assessment, not to replace professional repair. There are clear situations where escalating to a technician is the right decision, and recognizing those situations is part of what makes the checklist useful.
Escalation is appropriate when:
• The printer shows electrical symptoms — unusual smells, unexpected shutdowns, or error codes related to power delivery or motor drivers — that cannot be traced to a known software setting.
• Mechanical failure is visible but the component involved is embedded in a way that requires disassembly beyond routine maintenance access.
• The printer has undergone basic diagnostics and the problem remains unresolved after systematic checks of mechanical, software, and calibration systems.
• Print quality degradation is affecting production output consistently, and the cost of continued downtime exceeds the cost of a service call.
• A repair attempt has already been made and the problem has changed character rather than resolved — which may indicate a secondary issue was introduced during the attempt.
Reaching that decision point with a documented checklist in hand makes the technician’s job more efficient and the repair process faster. You arrive with context, not just a complaint.
Closing Thoughts
3D printer repair is a broad category that covers everything from routine maintenance to component-level diagnostics. For most operators, the majority of issues fall somewhere in between — not trivial, but not beyond the reach of structured self-assessment either.
Working through a consistent checklist before escalating has real operational value. It reduces unnecessary service calls, shortens diagnostic time when a technician is involved, and builds the kind of working knowledge that makes future troubleshooting faster. More importantly, it shifts the approach from reactive to methodical — which is how reliable production environments handle equipment across every industry.
A 3D printer that is maintained and monitored with discipline will fail less often and recover more quickly when it does. That outcome is less about technical expertise and more about developing a consistent process — which is exactly what a checklist is designed to support.